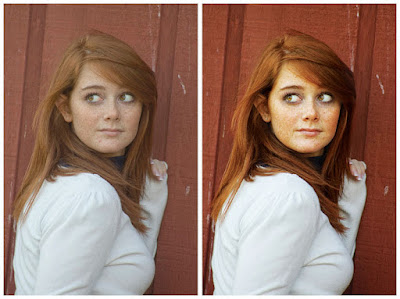
One the left you have the SOOC (Straight Out of the Camera) image. You can see its not a bad image. It's nicely composed, however, it feels a little flat. As a photographer, we don't want our clients feeling or looking flat. So, Photoshop CS3 to the rescue. The image on the right was "refined" in PS3. My first step, adjusting the levels (Command + L on a Mac, Control + L on a PC) a tad. Step 2: Getting rid of all the flaws (i.e. blemishes, stay hairs, etc) with either the Stamp Tool or Healing Brush. There is no reason for a beautiful model to have a zit when you can easily get rid of it. Step 3: Created a second layer and and gave it a "Screen" layer style. Then created a layer mask and painting back in the eyes. At this stage the eyes look really bad so I lowered that layers opacity to about 35% making the eye look bright and lively versus "evil". Then I flattened the image. Step 4: I duplicated the layer again and gave the new layer a a "Hard Light" layer style. Again, I made a mask and quickly painted back in her hair and face. Then I drop the opacity of that layer to about 40%. Step 5: Flatten the image one last time and "bam" done. Now, if you wanted to you could have kept all the layers and saved it as a Photoshop document. But for this exercise I just flattened mine.
Thanks to Puna for making me "Play" a little today. I also want to give some props to the folks over at "I Heart Faces" for coming up with this idea. I hope they get a ton of responses. Here is thier link go check them out.

8 comments:
I found you via I Heart Faces, and it is so nice to have a boy play along! :) Loved your after image and the explanation was straight forward. I will have to give it a go myself!
Yes, I LOVE that you gave the steps that you did too!
Me, too! Great tutorial, and beautiful results!!
I love how you made it so beautiful, so easily and the result is so dramatic and lovely! You preserved her genuineness.
Thanks for sharing the steps you took. I too wanted to really make the freckles stand out, but in doing so, I lost the details in the sweater. You managed to keep both. I'm going to see if I can apply the steps you gave in Elements. Nice job!
Love your edit! Nice of you to put the steps.
Danny, I'm so glad you decided to take a break from work and play! I like your image. Bam, it was so easy!
Your enhanced photo looks fantastic! I'm so glad that you found out about us and decided to join in on the fun. :)
~Angie
co-founder of I ♥ Faces
Post a Comment