My buddy and fellow photog,
Puna, sucked me into this Fix-it-Friday post. After reading her blog today, well, I just felt the challenge being laid down. The challenge is to make the image of the Redheaded Beauty look better than the one that came out of the camera. So, this is my attempt.
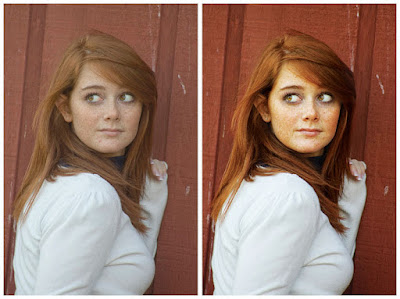
One the left you have the SOOC (Straight Out of the Camera) image. You can see its not a bad image. It's nicely composed, however, it feels a little flat. As a photographer, we don't want our clients feeling or looking flat. So, Photoshop CS3 to the rescue. The image on the right was "refined" in PS3. My first step, adjusting the levels (Command + L on a Mac, Control + L on a PC) a tad. Step 2: Getting rid of all the flaws (i.e. blemishes, stay hairs, etc) with either the Stamp Tool or Healing Brush. There is no reason for a beautiful model to have a zit when you can easily get rid of it. Step 3: Created a second layer and and gave it a "Screen" layer style. Then created a layer mask and painting back in the eyes. At this stage the eyes look really bad so I lowered that layers opacity to about 35% making the eye look bright and lively versus "evil". Then I flattened the image. Step 4: I duplicated the layer again and gave the new layer a a "Hard Light" layer style. Again, I made a mask and quickly painted back in her hair and face. Then I drop the opacity of that layer to about 40%. Step 5: Flatten the image one last time and "bam" done. Now, if you wanted to you could have kept all the layers and saved it as a Photoshop document. But for this exercise I just flattened mine.
Thanks to Puna for making me "Play" a little today. I also want to give some props to the folks over at "I Heart Faces" for coming up with this idea. I hope they get a ton of responses. Here is thier
link go check them out.


